YP DIAMONDS - A FLAWLESS CHOICE


Round remains the most popular shape for diamonds.virtually all round diamonds are brilliant-cut and for good reason.when cut as round brilliant,the diamond's angles help to enhence its fire and brilliance.

Oval is a shape that pairs well with other shapes of gems in multi-stone rings. Ovals have the added benefit of appearing larger because of their elongated shape. Ovals cut in the brilliant style display a brightness similar to round brilliant cut diamonds. Oval brilliant cut diamonds often display a “bow-tie.”

This shape pairs well with other gem shapes in multi-stone rings, and if a prong mounting is chosen, V-shaped prongs will help protect the points.This elongated shape with pointed ends was inspired by the stunning smile of the Marquise de Pompadour and commissioned by France’s Louis XV, who wanted a diamond to mirror his mistress’ grin.

Jewelers consider the pear shaped diamond a “fancy shape,” meaning it’s a shape other than round.Resembling a teardrop, the pear shape blands the best of the round and marquise shapes. Rounded sholders and wings create an appealing outline.

It is essentially a pear-shaped diamond with a notch cut into the rounded end. When looking for a Heart shaped diamond, it is important to look for a stone with an even shape and a well-defined outline.

The Princess belongs to the Modified cut type. Its cut follows the stone's natural crystalline shape. This sharp edged square often has a very fat stone depth in order to maximize its magnificent brilliance. Compared to other Fancy color shapes of the same size, the Princess cut is often priced higher since it's very difficult to bring out the color of the stone.

The Asscher belongs to the Step cut type. It is a very unique square shaped stone that strongly resembles the rectangular shaped Emerald cut diamond. It also contains rectangular shaped facets that are cut in steps through the pavilion of the stone. It is highly recommended to choose a higher clarity grade stone for this cut-cornered diamond since the table is quite open.
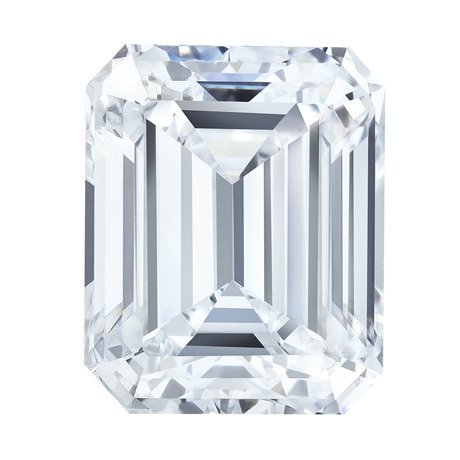
The Emerald belongs to the Step cut type. It is a unique shape as its pavilion is cut with rectangular facets. Since the Emerald shape has a very open table, people often prefer a higher clarity grade stone to hide minor defects. The rectangular cuts along the pavilion are always done in steps, which are clearly seen through the table of the stone.

Radiant shaped diamonds are square or rectangular cuts with an evenly cut-cornered edge. Its 70 faceted cut maximizes the effect of the color refraction through the stone.The Radiant is considered one of the most common shapes used with Fancy Color Diamonds along with the Cushion shape.

The Cushion is considered one of the most common shapes in Fancy Color Diamonds along with the Radiant shape. Diamond cutters often prefer to cut the rough into Cushions or Radiant since due to the structure of their facets, this shape offers the maximum potential to show off the color.

In diamonds, rarity equals value. With diamonds in the normal range, value is based on the absence of color, because colorless diamonds are the rarest. With fancy color diamonds—the ones outside the normal color range—the rarest and most valuable colors are saturated pinks, blues, and greens. In all cases, even very slight color differences can have a big impact on value.
Diamonds in the normal color range are colorless through light yellow and are described using the industry’s D-to-Z color-grading scale. Fancy color diamonds, on the other hand, are yellow and brown diamonds that exhibit color beyond the Z range, or diamonds that exhibit any other color face-up. These rare specimens come in every color of the spectrum, including, most importantly, blue, green, pink, and red.
Gem diamonds in the D-to-Z range usually decrease in value as the color becomes more obvious. Just the opposite happens with fancy color diamonds: Their value generally increases with the strength and purity of the color. Large, vivid fancy color diamonds are extremely rare and very valuable. However, many fancy diamond colors are muted rather than pure and strong.
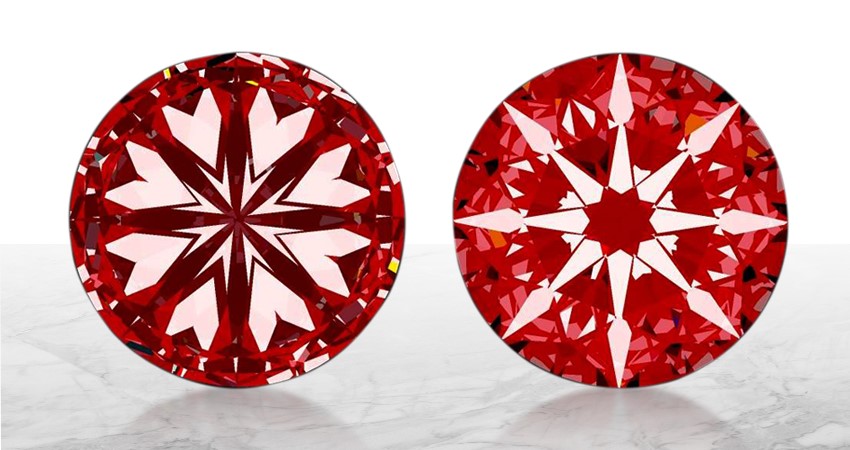
Hearts and Arrows diamonds are precision-cut round diamonds. Because of their exact angles and symmetry, they show a hearts-and-arrows pattern when viewed through a special tool. Arrows are visible from the top of the diamond, and hearts are visible when the diamond is face-down. The arrows in a well-cut diamond can be seen even without using a special tool. However, you have to see the diamond spot-on to see this pattern, and it's difficult to capture in images after the diamond is set in jewelry.
In the 1980s, Japanese diamond cutters were first to produce round brilliant diamonds cut so exactly that their facet reflections overlapped in 3D space, creating kaleidoscopic patterns when seen through reflecting viewers. Those polishers used “secret recipes” to create the pattern of "Hearts" when viewed looking down on the pavilion and "Arrows" in the crown, when viewed in the table-up position. The precision and crispness of these patterns relied on precise angles in combination with specific facet length, width and azimuth. Their techniques spread to other cutting houses and Hearts & Arrows diamonds began appearing on several continents by the mid-1990s.
In past decades tools and measuring devices have improved. Now a percentage of well-cut diamonds near the center of the Excellent-Ideal range, show some level of optical precision, simply as a by-product of good tooling; what some cutters would call a ‘happy accident.’ Diamonds held to the uppermost level of craftsmanship show extremely precise patterns. These exquisite diamonds are valued for the care, precision and consistency demonstrated in their cutting as much as any visible effects that results from this precision. There is also the attractiveness of rarity. Just as D color and Flawless clarity are rare, so is the Hearts & Arrows (H&A) level of cut quality. Top H&A diamonds are valued for their uniqueness and quality as the ultimate in cutting precision.
| Size Range 0.30 up |
| FL, IF, VVS1, VVS2, VS1, VS2, SI1, SI2, SI3, I1, I2, I3 |
| D, E, F, G, H, I, J, K, L, M, N, O-P, Q-R, W-X, Y-Z |
| # | Cut Grades | Description |
|---|---|---|
| 1 | EX | Excellent |
| 2 | VG | Very Good |
| 3 | GD | Good |
| 4 | F | Fair |
| # | Polish | Description |
|---|---|---|
| 1 | EX | Excellent |
| 2 | VG | Very Good |
| 3 | GD | Good |
| 4 | F | Fair |
| # | Symmetry Grades | Description |
|---|---|---|
| 1 | EX | Excellent |
| 2 | VG | Very Good |
| 3 | GD | Good |
| 4 | F | Fair |
| # | Grade | Description |
|---|---|---|
| 1 | N | None |
| 2 | TCR01/SCR01 | Table/Side Minor Crystal |
| 3 | TCR1/SCR1 | Table/Side Crystal Small |
| 4 | TCR2/SCR2 | Table/Side Crystal Medium |
| 5 | TCR3/SCR3 | Table/Side Crystal Heavy |
| 6 | TF01/SF01 | Table/Side Minor Feather |
| 7 | TF1/SF1 | Table/Side Feather Minor |
| 8 | TF2/SF2 | Table/Side Feather Medium |
| 9 | TF3/SF3 | Table/Side Feather Heavy |
| 10 | TCL01/SCL01 | Table/Side Minor Cloud |
| 11 | TCL1/SCL1 | Table/Side Cloud Minor |
| 12 | TCL2/SCL2 | Table/Side Cloud Medium |
| 13 | TCL3/SCL3 | Table/Side Cloud Heavy |
| # | Grade | Description |
|---|---|---|
| 1 | N | None |
| 2 | TB01/SB01 | Table/Side Minor Black |
| 3 | TB1/SB1 | Table/Side Small Black |
| 4 | TB2/SB2 | Table/Side Medium Black |
| 5 | TB3/SB3 | Table/Side Heavy Black |
| # | Grade | Description |
|---|---|---|
| 1 | N | None |
| 2 | TO01/SO01 | Table/Side Minor Open |
| 3 | TO1/SO1 | Table/Side Small Open |
| 4 | TO2/SO2 | Table/Side Medium Open |
| 5 | TO3/SO3 | Table/Side Heavy Open |
| 6 | NT01/NS01 | Natural Table/Side Minor |
| 7 | NT1/NS1 | Natural Table/Side Small |
| 8 | NT2/NS2 | Natural Table/Side Medium |
| 9 | NT3/NS3 | Natural Table/Side Heavy |
| 10 | TCV01/SCV01 | Table/Side Minor Cavity |
| 11 | TCV1/SCV1 | Table/Side Small Cavity |
| 12 | TCV2/SCV2 | Table/Side Medium Cavity |
| 13 | TCV3/SCV3 | Table/Side Heavy Cavity |
| # | FL Grades | Parameters |
|---|---|---|
| 1 | N | None Fluorescence |
| 2 | FNT | Faint Fluorescence |
| 3 | MED | Medium Fluorescence |
| 4 | STG | Strong Fluorescence |
| 5 | VST | Very Strong Fluorescence |
| # | Grade | Color Shade | Color Shade Description |
|---|---|---|---|
| 1 | N | None | None |
| 2 | B1/G1/MT1 | Brown/Green/Mix | Light Tinge |
| 3 | B2 | Brown/Green/Mix | Medium Tinge |
| 4 | B3 | Brown/Green/Mix | Heavy Tinge |
| # | Grade | Size/Description |
|---|---|---|
| 1 | N | None |
| 2 | M1 | Light |
| 3 | M2 | Medium |
| 4 | Medium | Heavy |
| # | Grade | Description |
|---|---|---|
| 1 | No | None |
| 2 | Yes | 100% |
| 3 | Borderline | 80%-90% |
| 4 | E1 | 60%-70% |
| 5 | E2 | 50% |
| # | Grade | Description |
|---|---|---|
| 1 | EX | Ex H%A |
| 2 | VG | VG H%A |
| 3 | NV | None Visible |
| # | Grade | Description |
|---|---|---|
| 1 | CM | Canada Mark |
| 2 | CME | Canada Mark Eligible |
| 3 | FM | Forever Mark |
| 4 | FMG | Forever Mark Grading |
| 5 | FME | Forever Mark |
| 6 | FMI | Forever Mark Inscribed |
| # | Lab | Description |
|---|---|---|
| 1 | GIA | Gemological Institute of America |
| 2 | IGI | International Gemological Institute |
| 3 | HRD | Hoge Raad voor Diamand |
| This is the date on which new goods transfer for sale. |
